Tojiba NFT Compositor 2
screenshots
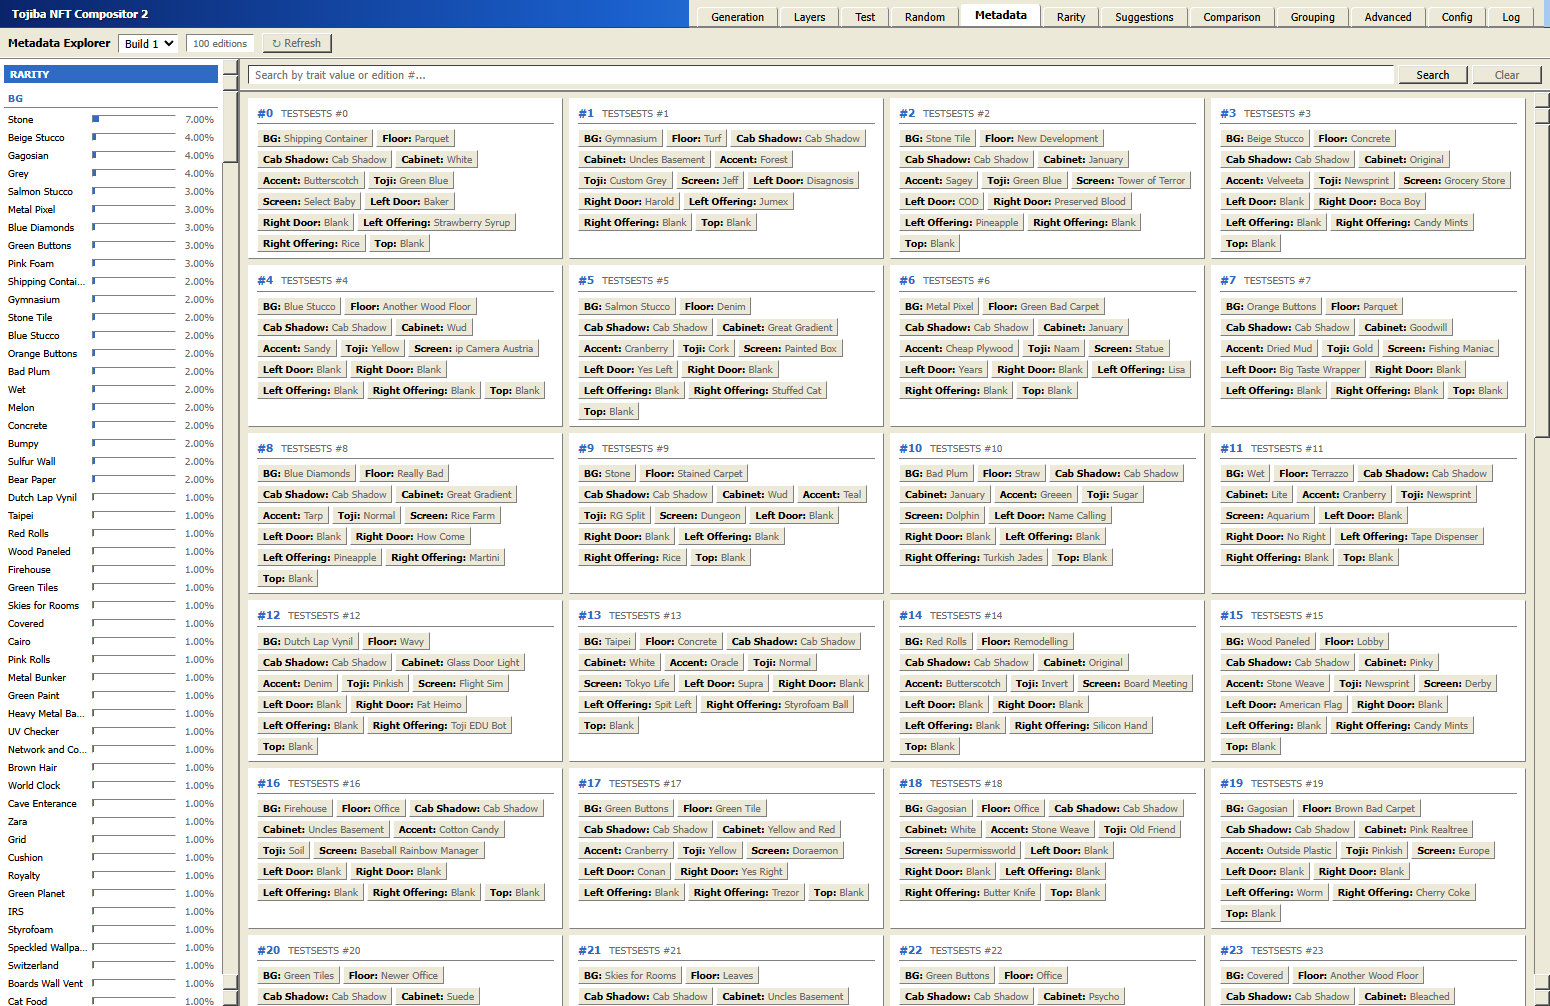
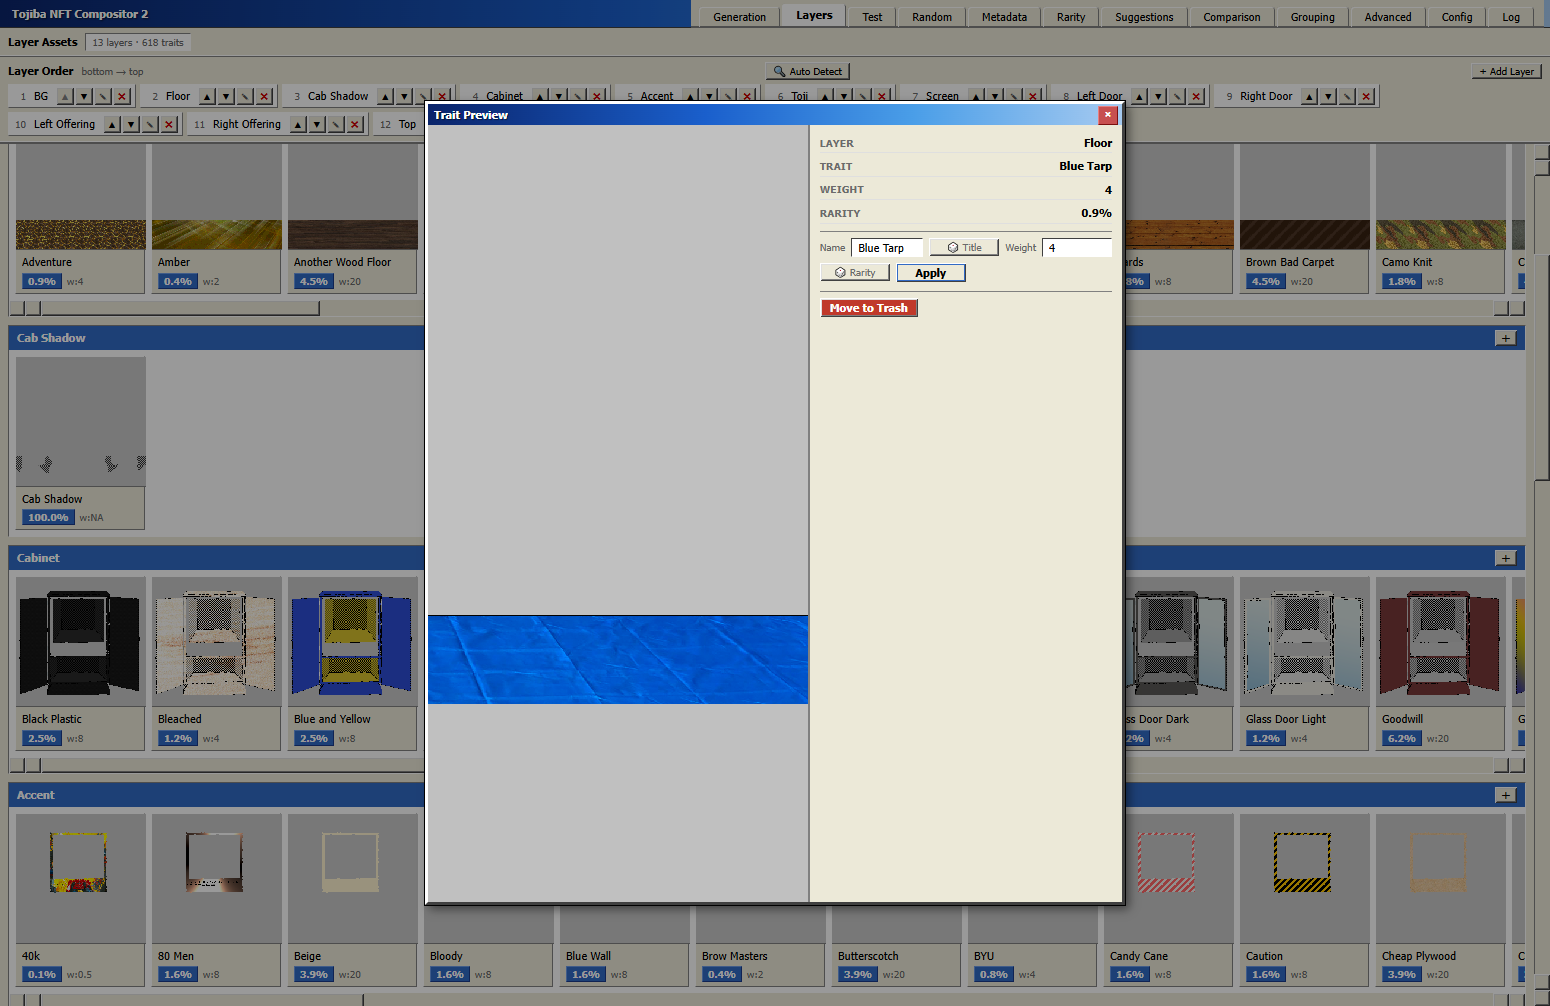
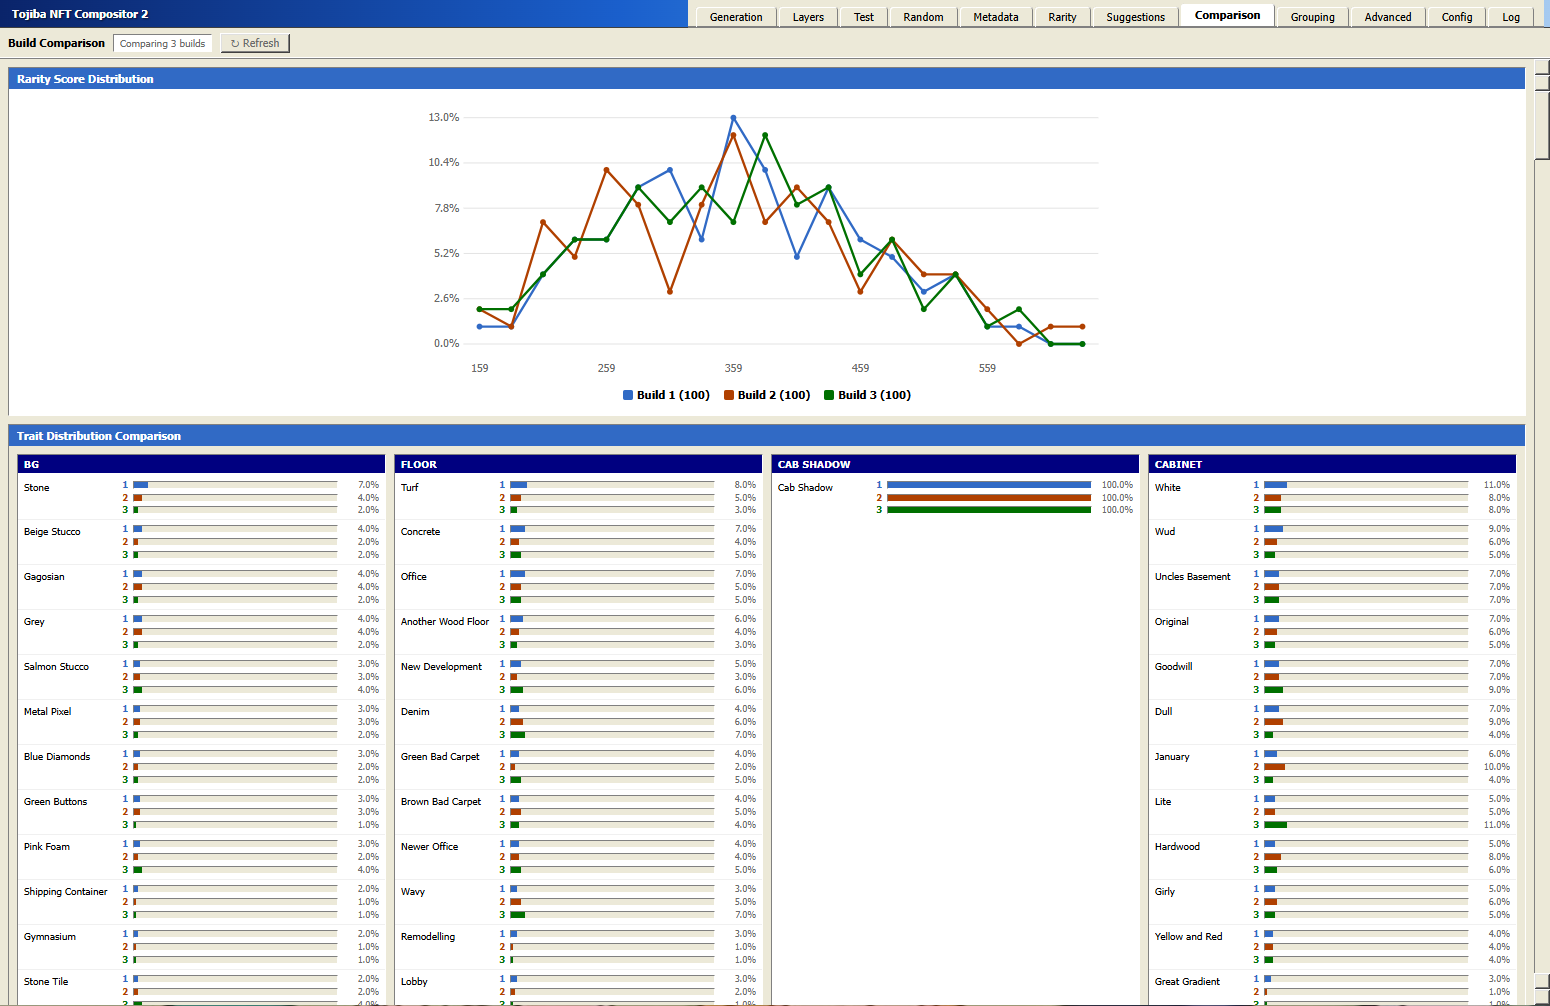
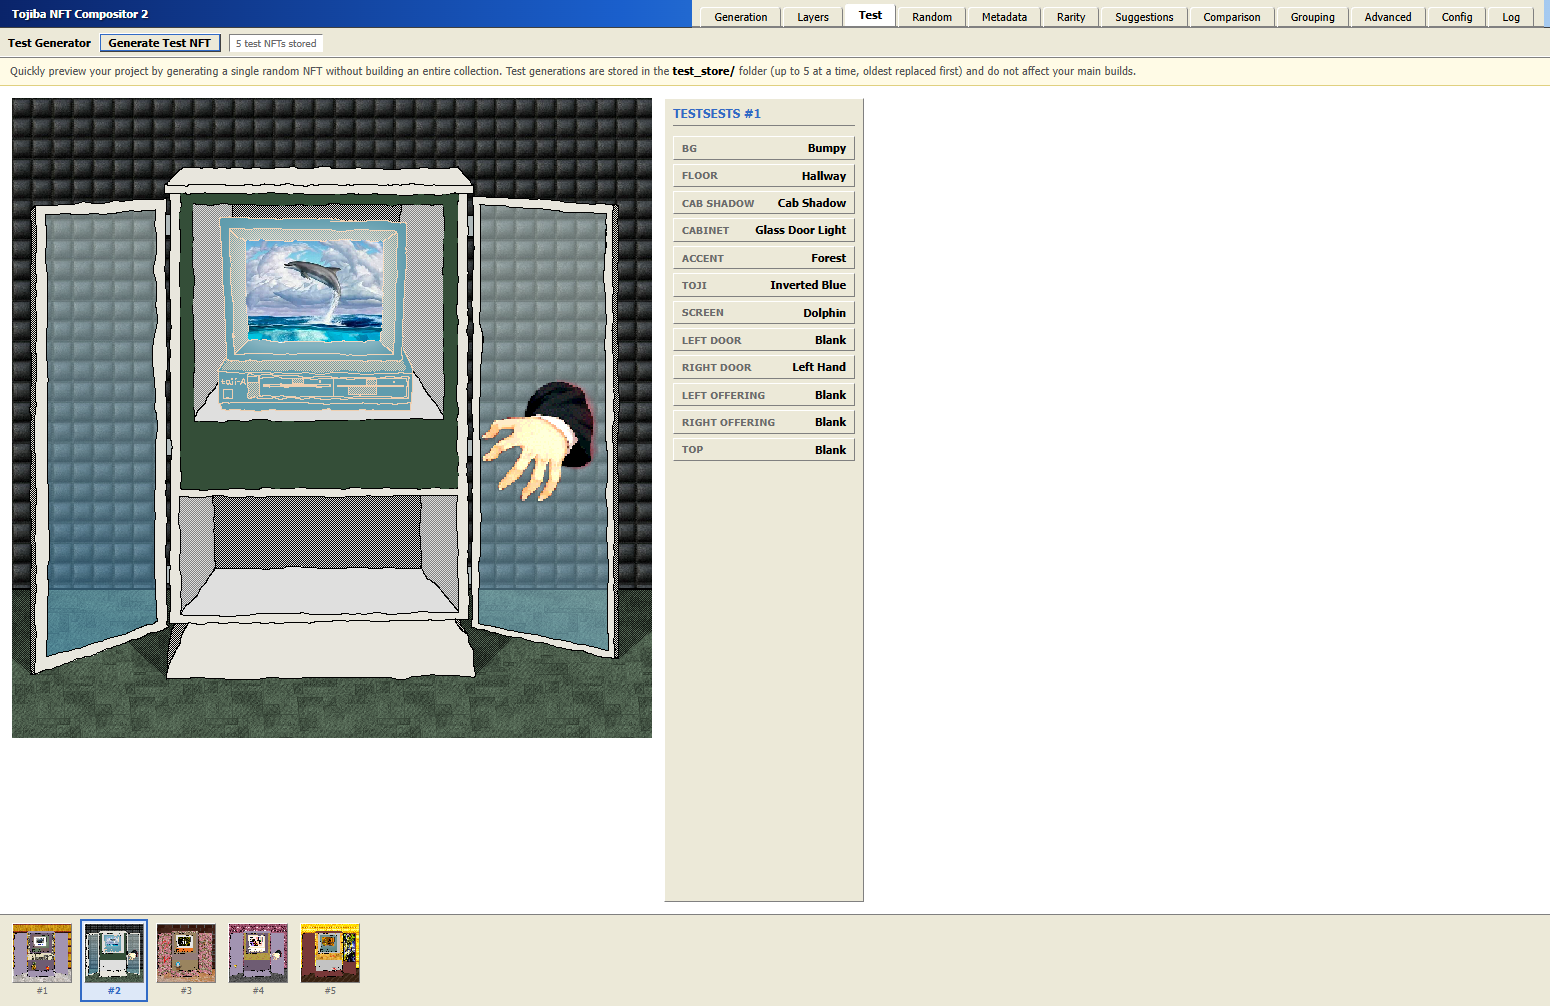
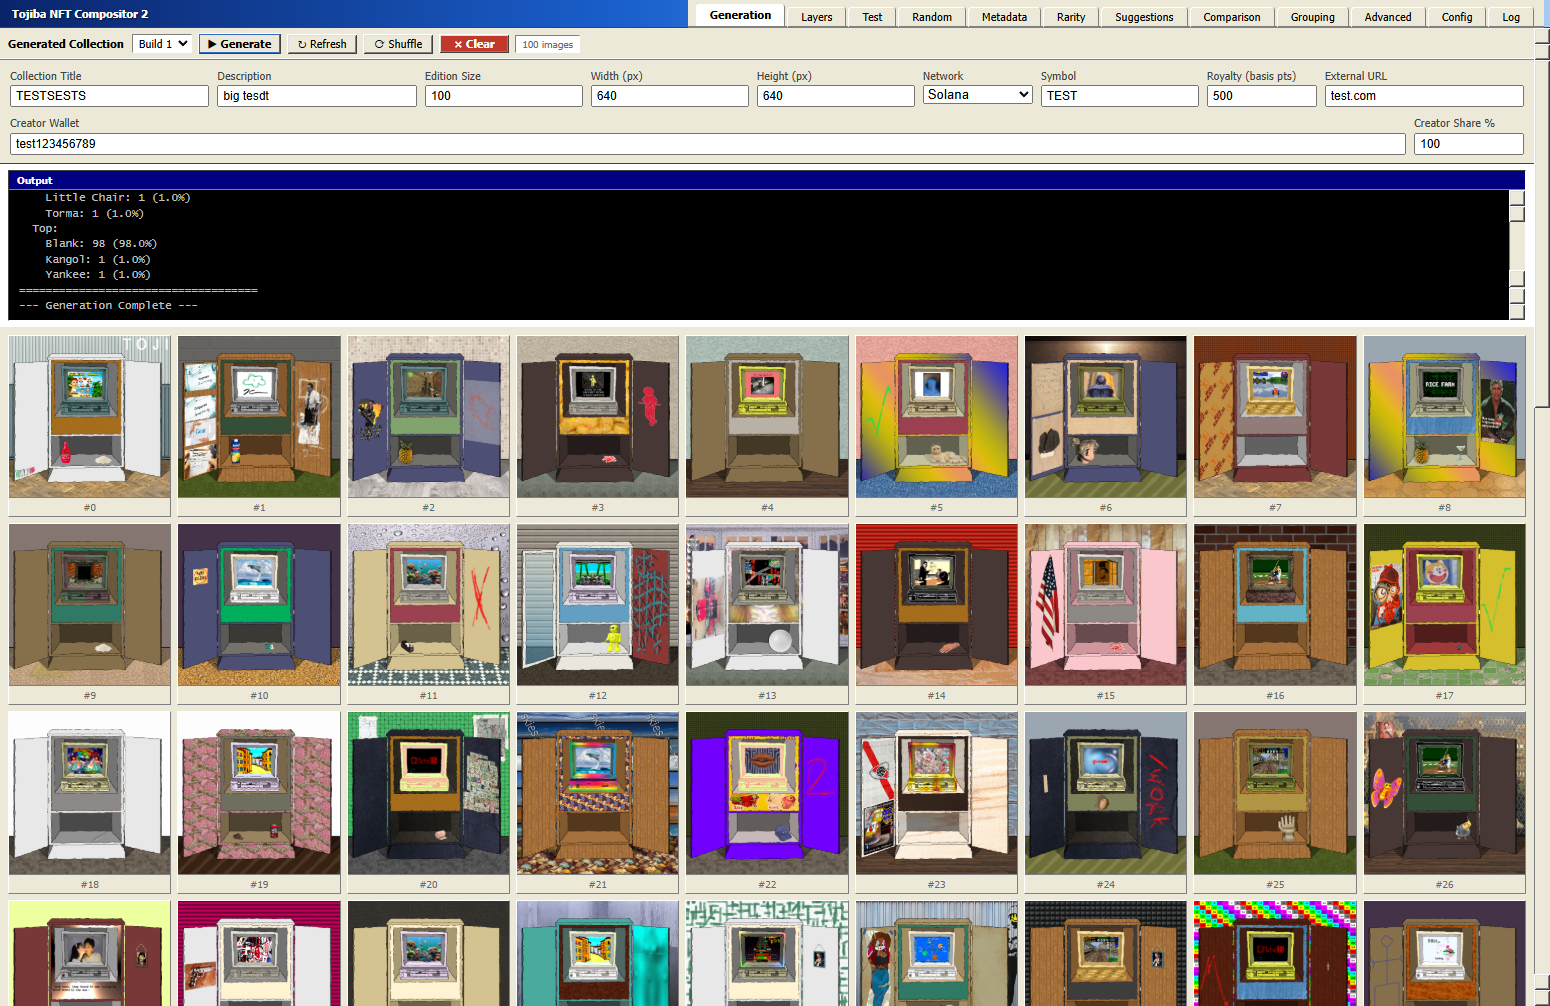
# Tojiba NFT Compositor 2 — User Guide ## Overview Tojiba NFT Compositor 2 generates NFT collections by layering PNG trait images on top of each other. You provide the artwork (one folder of PNGs per layer), configure your settings, and the program composites them into a complete collection with matching metadata JSON files ready for minting. The interface is split into **tabs** along the top of the window. Each tab handles a different part of the workflow. This guide walks through every tab in the order you'll typically use them. --- ## The Build Selector Most tabs have a **Build 1 / Build 2 / Build 3** dropdown in the top bar. The program supports three independent build slots so you can generate and compare multiple collection variants without overwriting your work. Switching the dropdown changes which build's data you're viewing on that tab. All dropdowns stay in sync — changing one changes all of them. --- ## Tab: Generation This is the home screen and the tab you'll use most often. ### Collection Settings At the top of the tab are five fields that control your collection: | Field | What it does | |---|---| | **Collection Title** | The name prefix for each NFT (e.g. `My Collection` → `My Collection #1`, `My Collection #2`, …) | | **Description** | A short description written into every NFT's metadata | | **Edition Size** | How many NFTs to generate | | **Width (px)** | Output image width in pixels | | **Height (px)** | Output image height in pixels | Changes to these fields are saved automatically when you press Enter or click away. They update the config file directly. ### Buttons - **▶ Generate** — Starts generating the full collection into the selected build slot. A live output log appears below the settings while generation runs. Once complete, all generated images appear as a scrollable thumbnail grid. - **■ Stop** — Appears during generation. Cancels the run early. A warning banner will remind you the build is incomplete. - **⟳ Refresh** — Reloads the image grid from disk (useful if you've made changes outside the app). - **⟳ Shuffle** — Randomly reassigns edition numbers across the whole collection. Both the image files and their JSON metadata are renamed to match. Useful if you want to randomize which piece gets number 1, 2, etc. before minting. - **× Clear** — Permanently deletes all images and JSON from the selected build slot. A confirmation prompt appears first. ### Viewing Generated NFTs Click any thumbnail to open a full-size detail modal showing the image alongside all of its trait attributes. Click the image inside the modal to open it in a new browser tab at full resolution. --- ## Tab: Layers This is where you manage your trait artwork. Every subfolder inside the `layers/` folder on disk appears here as a column. ### Layer Order Panel At the top is the **Layer Order** panel. Layers are composited **bottom to top** — the first layer in the list is drawn first (at the bottom), and the last layer is drawn on top. - **▲ / ▼ arrows** — Move a layer up or down in the render order. - **✎ pencil button** — Rename a layer folder. This renames the folder on disk and updates the config. - **× button** — Remove a layer from the config. The folder and image files are **not** deleted from disk, they just stop being used. - **+ Add Layer** — Create a new named layer folder. - **🔍 Auto Detect** — Scans the `layers/` folder and adds any subfolders that aren't already in the config. Handy if you've added folders manually outside the app. ### Trait Cards Below the layer order panel, each layer is shown as a column of trait cards. Each card shows: - The trait image thumbnail - The trait name - Its **weight** (`w:5` means weight 5) and its calculated **rarity percentage** based on the weights A small **×** badge in the corner of a card means that trait image's dimensions don't match the configured width/height. **Click any trait card** to open the Trait Detail modal. ### Trait Detail Modal - **Name** — Edit the trait's display name. Click **🎲 Title** to generate a random pronounceable name. - **Weight** — A number controlling how often this trait appears relative to others in the same layer. Higher = more common. Click **🎲 Rarity** to assign a random weight from 1–20. Click **Apply** to save. - **Move to Trash** — Moves the PNG file to a `trash/` folder (organized by layer). It won't be deleted permanently and can be restored manually. ### Uploading Traits Each layer column has a **+** button in its header. Click it to open a file picker and upload one or more PNG files into that layer. If the files don't match the configured canvas size, you'll be warned before they're added. > **Filename format:** Weights are set by including `#number` in the filename before the extension, e.g. `RedHat#5.png` has weight 5. If no `#` is present, the weight defaults to 1. Filenames must not contain dashes (`-`). --- ## Tab: Test Use this tab to quickly preview a single randomly generated NFT **without** running a full generation or touching any of your build slots. Click **Generate Test NFT** to produce one composited NFT. The result appears with its image and all trait attributes shown. Up to **5 test NFTs** are stored at a time (in the `test_store/` folder); when you generate a 6th, the oldest is replaced. A thumbnail strip at the bottom shows all stored test slots. Click any thumbnail to switch the main display to that slot. This tab is ideal for sanity-checking layer alignment and weight configuration before committing to a full generation. --- ## Tab: Random Viewer Shows a single randomly selected NFT from your generated collection with its full metadata. Click the **Random** button to jump to a different random piece. Click the image to open it full size in a new tab. This is useful for casually browsing your collection or doing a quick eyeball check of the output. --- ## Tab: Metadata Explorer A searchable, filterable view of every NFT in your collection's metadata. ### Rarity Sidebar The left panel lists every trait across every layer with a percentage bar showing how common it is in the generated collection. Traits with 0% (exist in layers but never appeared in the output) are shown at the bottom under "Unused Traits — 0%". **Click a trait row** to filter the main results to only NFTs that have that trait. Click multiple rows to AND-filter (show NFTs that have all selected traits). Right-click a selected row to deselect it. ### Search Bar Type into the search bar to filter by: - **Edition number** — type `42` to find NFT #42 - **Trait value** — type `Blue` to find any NFT with a trait value containing "Blue" - **Multiple terms** — separate with commas to find NFTs matching all terms (AND logic) Press **Enter** or click **Search** to apply. Click **Clear** to reset all filters and deselect any sidebar selections. **Click any result card** to open the full NFT detail modal with image and attributes. --- ## Tab: Rarity A detailed statistical view of your generated collection. Contains three sections: ### 1. Trait Distribution Bar charts showing the actual percentage each trait value appeared across all generated NFTs, grouped by layer. Unused traits (0% occurrence) are shown in a dimmer style at the bottom of each group. ### 2. NFT Rarity Scores Each NFT gets a **rarity score** calculated as the sum of `(total_editions ÷ trait_frequency)` across all its traits. Higher scores mean rarer combinations. - **Score Distribution** — A histogram showing how scores are spread across the collection. A bell-curve shape means rarity is well-distributed; a spike at one end means many NFTs have very similar rarity. - **Ranked by Rarity** — A full ranked list from rarest (#1) to most common, with gold/silver/bronze highlights for the top three. Click any edition number to open that NFT's detail modal. ### 3. Similar NFTs Set a similarity threshold (default: 75%) and click **Scan** to find any pairs of NFTs that share that percentage or more of their traits. Results show which traits are shared and what the differences are. Click an edition number to view it. --- ## Tab: Suggestions Automated recommendations for improving your collection's quality. Contains two sections: ### Consecutive Trait Repeats Detects runs of NFTs with the same trait value in consecutive edition numbers (e.g. #10, #11, #12 all have the same Background). This can look bad when displayed sequentially. Each detected run shows the layer, value, and which editions are affected. Click **Fix** to automatically swap some of those editions with others elsewhere in the collection so the run is broken up. - **Ignore values** — Type a comma-separated list of values to exclude from detection (e.g. `blank, none` if you intentionally have many editions with no background). This setting is remembered between sessions. ### Weight Suggestions — Flatten Top-10 Spread Analyzes the top-10 rarest NFTs and looks for traits that are significantly underrepresented compared to what would be expected if all traits were equally weighted. For each such trait, it shows: - **Actual %** — How often it appeared - **Expected %** — What even distribution would look like - **Multiply weight by** — How much to increase the trait's weight to improve balance Traits that never appeared at all (0%) are flagged with a ⚠ warning. Apply the suggested weight changes in the Layers tab, then regenerate. --- ## Tab: Comparison Compares up to three builds side by side. Requires at least two build slots to have generated collections. ### Rarity Score Distribution An SVG line chart overlaying the score distribution of each build. Useful for seeing whether one generation attempt produced a better spread of rarity than another. ### Trait Distribution Comparison For every layer and every trait value, shows a bar for each build indicating how often that trait appeared. Spot where distributions differ between builds. ### Summary Statistics A table comparing key numbers across builds: - Total editions - Unique layers - Total distinct trait values used - Highest and lowest rarity scores - Score spread (difference between highest and lowest) --- ## Tab: Grouping Lets you define **influence rules** that bias trait selection during generation. For example: if a character is wearing a pirate hat, make the eyepatch trait three times more likely to appear. A group has two sides: - **Parent Assets** — The traits that trigger the rule. Each parent has a **multiplier** (e.g. ×3 = three times more likely; ×0.2 = five times less likely). - **Influenced Assets** — The traits whose weight gets multiplied when any parent asset is selected. ### How to create a group 1. Click **+ New Group**. 2. Give the group a name by editing the name field at the top of its card. 3. Under **Parent Assets**, select a layer and trait from the dropdowns, set a multiplier, and click **+ Add**. 4. Under **Influenced Assets**, select the traits whose probability should be affected, and click **+ Add**. 5. Groups are saved automatically. They take effect on the next **Generate** run. To remove a parent or influenced asset, click its **×** button. To delete an entire group, click the **×** in the group's header. > **Note:** Multipliers greater than 1 boost the influenced trait's chance; values between 0 and 1 suppress it. A value of 1 has no effect. --- ## Tab: Advanced Post-generation tools for fine-tuning your collection's metadata and handling special cases. ### Layer Settings — Linking & Metadata Visibility A table showing all layers with two options per layer: - **Link To** — Forces this layer to always pick the same-named file as another (source) layer. For example, a shadow layer could be linked to a body layer so the shadow always matches the body. Only layers that appear *before* this one can be selected as sources. - **Mute from metadata** — The layer still renders in the image, but its trait attribute is hidden from the JSON metadata. Useful for purely visual layers that shouldn't appear as collectible traits. Changes take effect on the next **Generate** run. ### Delete / Replace Edition Lets you surgically remove or replace a specific edition. 1. Enter an edition number in the **Edition #** field and click **Preview** (or press Enter) to see that NFT's image and traits. 2. Click **Delete Edition #N** to permanently remove its image and JSON. The edition slot becomes empty (a placeholder number gap in the collection). The **Empty Slots** panel on the right lists any edition numbers that are missing an image or JSON file. For each empty slot you can: - Choose a replacement image file from your computer - Edit the metadata JSON directly (pre-filled with a template based on your collection's format) - Click **Upload to #N** to fill the slot ### Bulk Edit Metadata Fields Applies changes to every edition's JSON file at once: - **Name prefix** — The text before `#N` in each NFT's name - **Description** — Replaces the description in all editions - **Image base URL** — The path prefix before `/N.png` in the `image` field (e.g. your IPFS CID after uploading to Filecoin/IPFS) - **Custom fields** — Add arbitrary key/value pairs to all JSONs. Leave the value blank to delete a field. Click **Apply to all editions** — a confirmation prompt appears before any changes are written. ### Add Hidden Layer Injects a metadata-only trait attribute (no corresponding image file) into every edition's JSON. Two modes: - **Same value for all NFTs** — Every edition gets the same value for this trait type (e.g. `Rarity Tier: Standard`). - **Conditional** — Build rules of the form *"If [layer] is [value] → assign [value]"*. The first matching rule wins. You can also set a **Default value** for NFTs that match no rules. Leave the default blank to skip those NFTs entirely. Click **Apply to all editions** to write the changes. --- ## Tab: Config A raw text editor for the `src/config.js` file. All settings are valid JavaScript. Use this tab for advanced configuration that the Generation tab doesn't expose, such as: - `background` — Enable/disable solid background generation and set its color - `shuffleEditions` — Automatically shuffle edition order after generation - `maxCollisionRetries` — How many times the engine tries to find a unique DNA before giving up - `network` — Switch between `NETWORK.eth` (Ethereum) and `NETWORK.sol` (Solana) - `solanaMetadata` — Solana-specific fields (symbol, seller fee, creators list) — see below - `baseUri` — The IPFS URI prefix for the `image` field in metadata - `extraMetadata` — Additional fields to inject into every JSON at the top level - `layerConfigurations` — Advanced: multiple generation runs with different layer sets and edition sizes ### Solana Metadata (`solanaMetadata`) If you are minting on **Solana**, you need to fill out the `solanaMetadata` block. It looks like this in the config: ```js const solanaMetadata = { symbol: "MYC", seller_fee_basis_points: 500, external_url: "https://yourwebsite.com", creators: [ { address: "REPLACE_WITH_SOLANA_ADDRESS", share: 100, }, ], }; ``` Here is what each field means: | Field | What to put here | |---|---| | `symbol` | A short ticker-style abbreviation for your collection, e.g. `"MYC"`. Usually 2–5 capital letters. | | `seller_fee_basis_points` | Your royalty percentage expressed in basis points. 100 basis points = 1%, so `500` = 5% royalty on secondary sales. Set to `0` for no royalty. | | `external_url` | A link to your project's website or social page. Can be left as `""` if you don't have one. | | `creators` | A list of wallet addresses that receive the royalty. The `share` values across all entries must add up to exactly `100`. | **Single creator example** (you keep 100% of royalties): ```js creators: [ { address: "YourSolanaWalletAddressHere", share: 100, }, ], ``` **Split royalties between two people** (60/40 split): ```js creators: [ { address: "FirstPersonsWalletAddress", share: 60, }, { address: "SecondPersonsWalletAddress", share: 40, }, ], ``` > **Note:** `solanaMetadata` is only written into the output JSON when `network` is set to `NETWORK.sol`. If you are minting on Ethereum, you can leave this block as-is and it will be ignored. Click **Save** to write the file. The status indicator shows "Saved!" or an error message. Click **↻ Reload** to discard unsaved edits and reload from disk. > **Caution:** The config file must remain valid JavaScript ending with `module.exports = { … }`. Syntax errors will prevent generation from running. --- ## Tab: Log A timestamped record of significant actions: generations started and completed, shuffles, metadata edits, file uploads, and deletions. Up to 500 entries are retained. Click **↻ Refresh** to load the latest entries. Most recent entries appear at the top. --- ## Typical First-Time Workflow 1. **Add your layer artwork** — Place PNG files into subfolders inside the `layers/` folder, or use the upload button on the Layers tab. Folder names become the layer (trait type) names. 2. **Set the layer order** — In the **Layers** tab, use the ▲/▼ arrows to arrange layers from bottom (background) to top (foreground). 3. **Check trait weights** — Click individual trait cards to adjust weights. Higher weight = appears more often. 4. **Configure the collection** — On the **Generation** tab, set the collection title, description, edition size, and canvas dimensions. 5. **Run a test** — Use the **Test** tab to generate a single NFT and verify that layers are compositing correctly. 6. **Generate** — Click **▶ Generate** on the Generation tab and watch the progress log. 7. **Review the output** — Use **Metadata**, **Rarity**, and **Suggestions** tabs to evaluate distribution quality and fix any issues. 8. **Update the image URL** — Once you've uploaded images to IPFS, go to **Advanced → Bulk Edit** and set the Image base URL to your CID. 9. **Export** — Your final images are in `build/images/` and metadata JSONs are in `build/json/`.